Tips and Tricks
How to fix poor signal, mobile data or calling issues in Samsung phones

If your Galaxy phone is experiencing low signal or even no signal at all, you may be unable to connect to the internet, and its ability to make or receive phone calls may be limited.
At peak times or in busy areas, towers may become overloaded, slowing down mobile data access. Make sure you verify your account is in good standing and service is active with your carrier.
Some carriers may slow data access once you have reached a certain limit, or data may be slower in certain areas. Contact the carrier to learn more.
If you’re facing these issues, then you are in right place, below you can check the options to solve these problems.
Fix 1
Common fixes for low or no signal on phone
Verify the account and services.
- Make sure your account is active and you haven’t reached any usage limits.
- If you have recently made any changes to your service, such as switching carriers or upgrading your plan or phone, contact your carrier to make sure everything is correct on their end.
Check your coverage.
- Some features of the nearby landscape, such as trees and buildings, can interfere with your phone’s reception, and this can vary by carrier.
- You may also be outside your carrier’s coverage area, or they may be experiencing an outage.
Reboot your phone.
- A reboot will close all running apps, and force the phone to reconnect to the towers.
Check common settings.
Swipe down from the top of the screen to open the Quick settings panel and make sure the following are set properly:
- Airplane mode should be disabled
- Mobile Data should be enabled
- Turn off Wi-Fi Calling
Next, open Settings, and then tap Connections. Tap Mobile networks, tap Network operators and then tap Select automatically.
Remove accessories.
- Remove any third-party accessories and cases because they can interfere with the antenna, especially if it claims to boost the signal.
- Unplug anything that may be in the USB port.
Check the SIM card.
- Verify that the SIM card is correctly installed and not damaged.
- If possible, test with another active SIM card.
- While you have the SIM out, check the liquid damage indicator.
Fix 2
Reset network settings on a phone or tablet
Open the network settings.
- Navigate to and open Settings. Search for and select Reset network settings.
Reset the network settings.
- Tap Reset network settings again, and then tap Reset settings. Tap Reset to finish.
FIX 3
Perform a software update on a phone or tablet
The phone or tablet will show the last date that it checked for updates. To download an update, you must be connected to the internet.
Download updates manually.
- On your device, navigate to and open Settings, tap Software Update, and then tap Check for updates. Tap OK.
- After the update, your device will restart.
- You can also check for updates using Smart Switch.
- If your carrier is Verizon, swipe to and tap System updates, and then tap Check for system updates.
Make sure your device has enough space if you’re having trouble.
- Make sure the phone or tablet is connected to the internet and charged more than 50 percent before installing a software update.
- Some carriers require a Wi-Fi network connection and will not allow you to update using mobile data.
- If an error occurs during a software update and your phone or tablet keeps restarting.
- If your phone or tablet doesn’t have enough storage space, you can clean up your storage with Device care.
Check your phone or tablet after the update.
- If you were having issues before the software update, use the phone or tablet normally to see if the problem has been solved.
FIX 4
Reboot the phone or tablet in safe mode
Certain downloaded apps can make your phone or tablet freeze, crash, or lag. Some apps can even affect camera functionality, cause audio issues, and affect network connectivity.
If the issues do not appear while in Safe mode, the problem is caused by a downloaded app and it should be uninstalled.
Reboot the phone or tablet in Safe mode.
First, open the Power menu:
- On phones with a regular Power key, press and hold the Power key until the Power menu is displayed.
- On phones without a dedicated power button, swipe down with two fingers from the top of the screen to open Quick Settings.
- Tap the Power icon at the top of the screen.
Touch and hold Power off until the Safe mode icon is displayed. Tap Safe mode to start your phone in Safe mode. If you’ve entered Safe mode successfully, you’ll see Safe mode displayed at the bottom of the screen.
Check if the phone or tablet is still having the same problem.
Use the phone or tablet normally and see if the issue has been resolved. If the phone or tablet is operating normally, a recently installed app was most likely causing the issue.
- If the issue is gone in Safe mode: One of your recently downloaded apps was likely the cause of the problem. Proceed to step 3.
- If the issue still exists: Downloaded apps may not be the cause of the problem. You may need to reset the phone or tablet to the factory setting.
Uninstall apps.
- One by one, uninstall any apps you downloaded just before your phone or tablet began having the issue.
- After uninstalling each app, restart the phone or tablet and see if it is functioning normally.
Reboot the phone or tablet normally.
- On phones with a regular Power key, press and hold the Power key until the Power menu is displayed.
- Tap the Power icon at the top of the screen.
Tap Power off to turn off the phone. Wait until the phone or tablet completely turns off, and then press the Power key again to turn it on. See if the issue has been resolved.
FIX 5
Perform a factory data reset on your phone or tablet
Before you reset the phone or tablet.
- Make sure to back up your phone or tablet. All data and settings will be erased.
- Write down the username and password for the account that you used to back up your data.
- If you have encrypted the SD Card inserted into your phone or tablet, make sure to decrypt it before the reset. Navigate to Settings, search for and select SD, and then tap Decrypt SD card.
Perform a factory data reset.
- Navigate to Settings.
- Search for and select Factory data reset.
- Tap Factory data reset again and then tap Reset.
- You may need to enter your Samsung account password or Lock screen password. The phone or tablet will reboot.
Samsung
One UI 6.1: How to activate Auto Blocker feature on Samsung devices

In today’s era, ensuring our online activities remain secure is very important. For that, Samsung has a powerful feature called Auto Blocker, which enhances user privacy and protects devices from cyber threats effectively. You can easily activate the Auto Blocker feature on your Samsung One UI 6.1 devices.
Auto Blocker feature is mainly valuable for safeguarding against malware and viruses that often infiltrate your device via applications outside the official platform such as the Google Play Store and Samsung Galaxy Store.
It prevents devices from downloading applications without user confirmation from suspicious sources. Users can enjoy a safer browsing experience with minimized exposure to potential threats.
Moreover, the feature also blocks unauthorized commands attempting to access the device through the USB port. This feature is especially useful when connecting devices to transfer files.
You can easily activate Auto Blocker on your One UI 6.1 Samsung device, just need to follow a few steps:
- Navigate to the Settings app on your smartphone.
- Scroll down and select Security and Privacy from the list of options
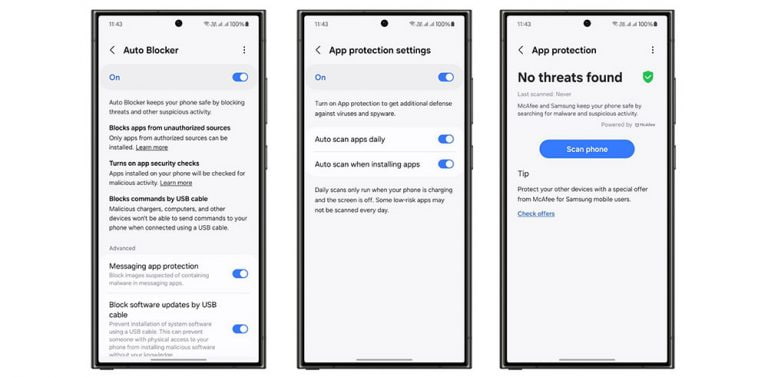
- Find the Auto Blocker menu. From there, toggle the feature on to enable its protective functionalities.

Users can also customize settings further, such as activating the Messaging app protection option or blocking software updates via USB, depending on their security preferences.
By enabling Auto Blocker, users significantly reduce the risk of malware and viruses infiltrating their devices through untrusted sources. This feature not only safeguards your personal data but also enhances the overall security of your Samsung device.
One UI 6.1
One UI 6.1: How to use Maintenance Mode on your Samsung device

Samsung has updated several Galaxy devices to One UI 6.1, with plans to extend this update to all eligible devices soon. This latest update not only enhances the overall performance but significantly boosts the device’s security. If you want your Samsung One UI 6.1 device to remain safe even during servicing, you can use the Maintenance Mode.
Maintenance Mode is an innovative feature that safeguards users’ personal data during device repair. As smartphones store increasingly sensitive information, it is important to protect this data when giving the device for repairs.
This mode allows service technicians to access the necessary functions of the phone without exposing any personal information. It enhances the privacy and security of Galaxy devices.
The feature also ensures that applications installed by the user are not removed. Any data or accounts created while in Maintenance Mode will be automatically deleted once the mode is turned off.
To activate Maintenance Mode on your Samsung One UI 6.1 devices, follow these steps:
- Go to Settings on your device.
- Select Device Care.
- Choose Maintenance Mode.
- In the menu, select the Secure Wi-Fi option.
- Click on Turn On to enable the feature.
- Restart the device as instructed to secure your personal data.

You’ll need to unlock your phone to turn off Maintenance mode. When you do, everything will go back to the way it was when Maintenance mode was first turned on.
One UI 6.1
One UI 6.1: How to turn on App Protection feature on Samsung devices

In an age where digital security is more important than ever, Samsung keeps Galaxy devices secure with its App Protection feature. Let’s see how you can enable the App Protection feature on your One UI 6.1 device and keep your Samsung smartphone more secure.
Samsung’s App Protection Feature scans your device to save it from the unseen dangers of malware and viruses. It works seamlessly in the background, automatically scanning all applications and files on your device.
If a security issue is noticed, you can uninstall or stop the download process of the related application to avoid data theft.
Here’s how to activate the App Protection feature
You can activate the App Protection feature on your One UI 6.1 device with just a few taps.
- Open Settings and select Device Care.
- Turn on App Protection within the Device Care menu.
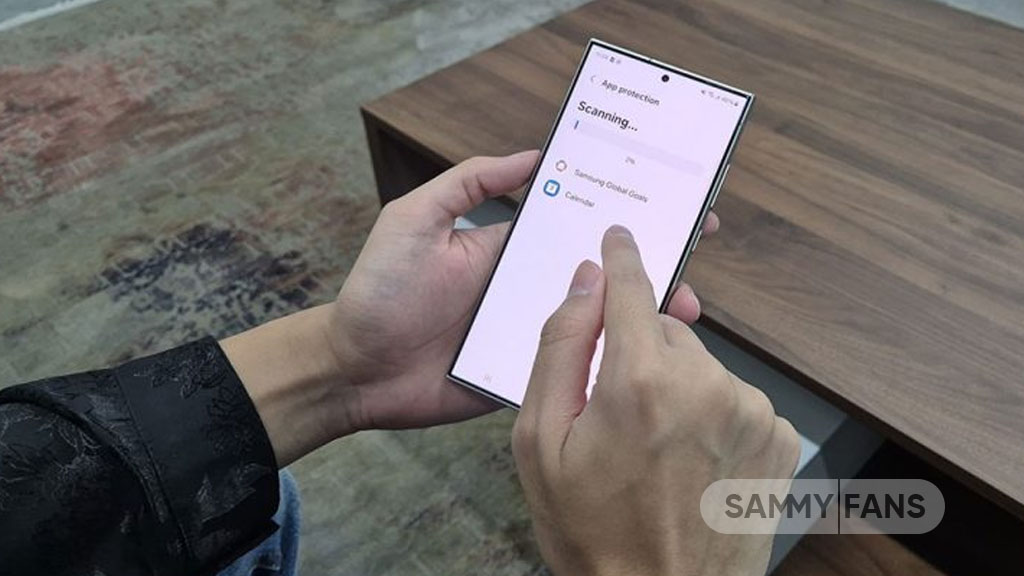
- After enabling, the device will start scanning.
- For additional settings, tap the More icon and go to Settings.
- Enable options such as Auto-scan apps daily and Auto-scan when installing apps.
- By enabling Auto Blocker, App Protection will also be activated.
By following these steps, you can set up your Galaxy smartphone to automatically monitor and protect your device. This feature simplifies the process of maintaining your digital safety, allowing you to focus on your day-to-day activities without worry.

Stay up-to-date on Samsung Galaxy, One UI & Tech Stuffs by following Sammy Fans on X/Twitter. You can also discover the latest news, polls, reviews, and new features for Samsung & Google Apps, Galaxy Phones, and the One UI/Android operating system.
Do you like this post? Kindly, let us know on X/Twitter: we love hearing your feedback! If you prefer using other social platforms besides X, follow/join us on Google News, Facebook, and Telegram.


