Tips
One UI 4.0 Tip: How to enable Dark mode on Samsung devices?

Samsung’s One UI user interface brings a unified mobile experience to Galaxy smartphones through simple and smooth interaction and clean and elegant design. This November, the company introduced the Android 12-based One UI 4.0 software system for Galaxy devices.
The brand new One UI 4.0 comes with enhanced privacy and protection functions that make it easier for users to understand exactly how their data are being used to customize their settings and deliver a more personalized mobile experience.
In the Android 12 update, Samsung has made great improvements to the behavior of Dark Mode. Wallpapers, icons, and images are now automatically dimmed to provide a more consistent look and more comfortable eyes in One UI 4.0.
How to enable Dark mode in One UI 4?
Dark mode allows you to switch to a darker theme to keep your eyes more comfortable at night, darkening white or bright screens and notifications.

Alternative 1:
- Go to your phone’s Settings
- Tap Display for the following options:
- Light: Apply a light color theme to your device (default).
- Dark: Apply a dark color theme to your device.
- Dark mode settings: Customize when and where Dark mode is applied.
– Turn on as scheduled: Configure Dark mode for either Sunset to sunrise or
Custom schedule
Alternative 2:
- First, swipe down from the top of the screen with two fingers to open the quick settings panel.
- Then, swipe to and tap the Dark mode or Night mode icon. When this mode is enabled, the icon will glow.
- To close the mode, click the icon again.

Aside from SammyFans’ official Twitter and Facebook page, you can also join our Telegram channel and subscribe to our YouTube channel to get notified of every latest development in Samsung and One UI ecosystem. Also, you can follow us on Google News for regular updates.
You may like:


One UI 6.1.1 introduced several new features and enhancements, one of which is the Motion Clipper feature of Editor. This feature lets you enhance your photos and create unique GIFs and stickers. This tool is perfect and useful for those who want to add a bit of fun and creativity to their photos and share them.
Motion Clipper is a minor yet powerful feature of One UI 6.1.1 that allows you to turn a part of your Motion Photos into animated GIFs or motion stickers. Users can easily use this feature when they have a motion photo in the Gallery app.
You have to open the motion photo in the Gallery app and long-press on a person or object you want to select. By doing so, you create a GIF or sticker from it. You can now use these custom GIFs and stickers on messenger apps or social media platforms that support Sticker Center.

Image Credit: Samsung
Currently, Motion Clipper is available on select Samsung models including the Galaxy Z Fold 6 and Flip 6. Additionally, several other flagships will get this feature with next major update.
These Galaxy devices will soon get the Motion Clipper feature of One UI 6.1.1.
Galaxy Z series
- Galaxy Z Fold 5
- Galaxy Z Flip 5
- Galaxy Z Fold 4
- Galaxy Z Flip 4
Galaxy S series
- Galaxy S22
- Galaxy S22 Plus
- Galaxy S22 Ultra
- Galaxy S23
- Galaxy S23 Plus
- Galaxy S23 Ultra
- Galaxy S24
- Galaxy S24 Plus
- Galaxy S24 Ultra
Galaxy Tab Series
- Galaxy Tab S8
- Galaxy Tab S8 Plus
- Galaxy Tab S8 Ultra
- Galaxy Tab S9
- Galaxy Tab S9 Plus
- Galaxy Tab S9 Ultra
One UI 6.1.1 will bring Sketch to Image feature to older Samsung devices

On July 10, Samsung launched the smallest and most compact product within the Galaxy lineup, the Galaxy Ring. It offers several innovative health management functions along with an exciting way to control your phone using simple gestures. You can easily activate gesture features on your Galaxy Ring.
Samsung Galaxy Ring’s gesture feature lets you turn on an alarm or take a photo or video while the camera app is running by double-clicking your finger and thumb while wearing the ring.
How to activate gestures on Galaxy Ring :
To use the Galaxy Ring’s gesture controls, follow these steps:
- Open the Galaxy Wearable app on the smartphone connected to the Galaxy Ring.
- Navigate to the “Gestures” section within the Galaxy Ring’ Settings.
- Choose which functions you want to control with gestures. Options include dismissing an alarm or taking a photo or video.

After you have chosen your desired functions, you can start using them by performing a simple gesture. To dismiss an alarm or capture a photo or video, double-tap with your finger and thumb while wearing the Galaxy Ring. This gesture will start the selected function without needing to touch your phone.
If you have a Galaxy Z Fold 6 or Z Flip 6 model, you can start using these features. This feature will be extended to other Galaxy devices through future software updates.
Galaxy Ring
Samsung Galaxy Ring features a sleek design with dimensions of 7.0 mm x 2.6 mm, 24-hour-a-day health monitoring, long-lasting battery from 18mAh (Size 5) to 23.5mAh (Size 13), Galaxy AI features, and more.
Moreover, the Galaxy Ring provides comprehensive health insights and analysis via the Samsung Health app without any additional fees. It gives detailed metrics on sleep patterns, including movement, sleep latency, heart rate, and breathing rate during sleep. It also introduces Energy score and Wellness tips for daily health insights.
Samsung finally releases Galaxy Ring: Here’s all you need to know
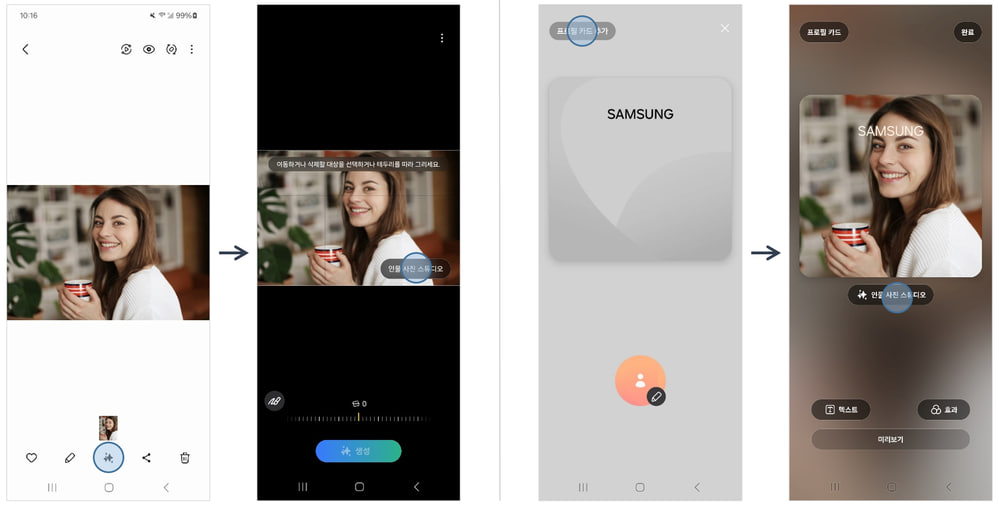
Samsung launched the Galaxy Z Flip 6 and Galaxy Z Fold 6 with One UI 6.1.1 software, introducing an impressive feature called Portrait Studio. This feature uses generative AI to transform normal photos into artistic portraits with just a few taps.
Portrait Studio of One UI 6.1.1 is accessible through Gallery and Contacts apps. It offers four different styles of portraits- Comic, 3D Character, Watercolor, and Sketch. Whether you prefer a comic-inspired look or a watercolor effect, there’s a style for every taste.
The process of using the Portrait Studio is very simple. First, select a portrait photo from your gallery, pick the desired style, and let the AI work its magic. Even if there are multiple people in the photo, you can select which individual you want the portrait created for.

The AI processing takes around 15 seconds to generate the portrait, and if you’re not completely satisfied with the result, you can easily create another version with the ‘Create Again’ button. Final Portraits can be saved through the photo editor or you can set directly it as a profile image for contacts.

The quality of the generated portrait improves with higher-resolution photos where the subject is visible and facing forward. Also, all portraits created using Portrait Studio contain a watermark in the bottom left corner to indicate their AI generation.
The good news is that Samsung plans to expand the availability of Portrait Studio beyond the Galaxy Z Flip 6 and Z Fold 6. Users of Galaxy Z Fold 5, Galaxy Z Flip 5, Galaxy Z Fold 4, Galaxy Z Flip 4, Galaxy S24, Galaxy S23 FE, Galaxy S23, Galaxy S22, Galaxy Tab S8, and Galaxy Tab S9 devices will soon also enjoy this amazing feature.
As the rollout progresses, more Samsung users can enjoy the amazing styles of AI-enhanced portraits on their smartphones. Stay tuned for more information.
One UI 6.1.1 update will bring Auto Zoom feature to Galaxy Z Flip 5