Tips
How to customize app notifications and what displays on your Galaxy phone’s lock screen
Samsung users or other android users, can’t go a minute without checking your Gmail, but you’re sick of getting alerts from that old game. Instead of constantly sifting through your notifications, select which apps send alerts and which ones don’t.
Thou you can also customize the way your favorite apps send alerts, which include notifications, sounds, and vibrations. To make things even better, you can snooze notifications or access an app’s notification settings from the Lock screen. The below steps helps you to manage your notifications right from the lock screen.
Read More: How to fix Wireless PowerShare issues on Samsung phones
View notifications
Did you just receive an important email? To view your notifications, swipe down from the top of your phone’s screen. Notifications will be displayed under the Quick settings panel.
- To open a notification, tap it.
- To clear all notifications, tap Clear.
- To close the Notification panel, swipe up or tap Back.
- To customize your notifications, tap Notification settings at the bottom of the panel.
- Tap See all to edit which apps you will receive notifications from.

Block app notifications
You can block notifications you don’t want, so they’ll be out of your hair.
- From Settings, tap Notifications.
- Tap See all and then tap the dropdown menu at the top of the page.
- Select All, and then the switch next to an app to turn its notifications on or off.

Customize app notification sounds
You can also pick different sounds for each notification. That way you’ll know whether it’s someone messaging you or if your lives have been refilled in your favorite game.
- From Settings, tap Notifications.
- Tap See all and then tap the dropdown menu at the top of the page. Select All, and then select your desired app.
- Next, turn its notification settings on or off by tapping the switch next to the different features.
- You can also adjust other notification settings from this page.

Note: Options may vary depending on the app.
App icon badges
App icon badges are the little dots that appear next to your apps when they receive a notification. You can adjust whether your apps display App icon badges or not.
- From Settings, tap Notifications, and then tap App icon badges.
- Tap the switch at the top to turn the badges on or off.
- Choose Number or Dot under Badge style to suit your preference.
![]()
Status bar settings
If a bunch of notifications is clogging up your status bar, you can hide them all or only show a couple.
- From Settings, tap Notifications.
- Tap the Status bar, and then adjust the desired settings.

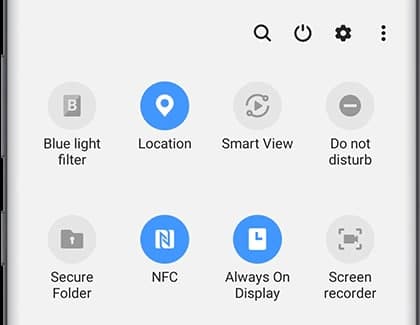
Quick settings
Certain settings on your phone have shortcuts built-in. Let’s say you’re about to take off, and you need to turn on Airplane mode. You can access it and other settings from the Quick settings panel.
- Swipe down from the top of your Home screen using two fingers.
- Then, tap your desired setting; the icon will glow when the setting is activated.
Snooze notifications
If you need to temporarily silence notifications or save them for later, you can set up a snooze option.
- From Settings, tap Notifications.
- Then tap the switch next to the Show snooze option to turn it on or off.

To snooze from the Notification panel:
- Swipe down from the top of your screen to open the panel.
- Then, swipe your desired notification to the left or right.
- Tap the Snooze icon (it looks like a bell), choose your desired option, and then tap Save.
Suggest actions and replies
You can ask your phone to offer suggestions when checking your notifications. This makes checking them easier if you’d like to perform an action without opening the app.
- To turn it on, navigate to Settings.
- Tap Notifications.
- Then tap the switch next to Suggest actions and replies.
![]()
Use the fingerprint sensor
Here’s a fun way to open or close the Notification panel: just swipe your finger up and down on your phone’s fingerprint sensor.
- To turn on this function from Settings, search for and select Finger sensor gestures.
- Tap the switch to turn it on.
- After the feature is turned on, give it a try by swiping your finger up and on the fingerprint sensor.

Note: This option is not available on phones with the in-screen fingerprint reader.


One UI 6.1.1 introduced several new features and enhancements, one of which is the Motion Clipper feature of Editor. This feature lets you enhance your photos and create unique GIFs and stickers. This tool is perfect and useful for those who want to add a bit of fun and creativity to their photos and share them.
Motion Clipper is a minor yet powerful feature of One UI 6.1.1 that allows you to turn a part of your Motion Photos into animated GIFs or motion stickers. Users can easily use this feature when they have a motion photo in the Gallery app.
You have to open the motion photo in the Gallery app and long-press on a person or object you want to select. By doing so, you create a GIF or sticker from it. You can now use these custom GIFs and stickers on messenger apps or social media platforms that support Sticker Center.

Image Credit: Samsung
Currently, Motion Clipper is available on select Samsung models including the Galaxy Z Fold 6 and Flip 6. Additionally, several other flagships will get this feature with next major update.
These Galaxy devices will soon get the Motion Clipper feature of One UI 6.1.1.
Galaxy Z series
- Galaxy Z Fold 5
- Galaxy Z Flip 5
- Galaxy Z Fold 4
- Galaxy Z Flip 4
Galaxy S series
- Galaxy S22
- Galaxy S22 Plus
- Galaxy S22 Ultra
- Galaxy S23
- Galaxy S23 Plus
- Galaxy S23 Ultra
- Galaxy S24
- Galaxy S24 Plus
- Galaxy S24 Ultra
Galaxy Tab Series
- Galaxy Tab S8
- Galaxy Tab S8 Plus
- Galaxy Tab S8 Ultra
- Galaxy Tab S9
- Galaxy Tab S9 Plus
- Galaxy Tab S9 Ultra
One UI 6.1.1 will bring Sketch to Image feature to older Samsung devices

On July 10, Samsung launched the smallest and most compact product within the Galaxy lineup, the Galaxy Ring. It offers several innovative health management functions along with an exciting way to control your phone using simple gestures. You can easily activate gesture features on your Galaxy Ring.
Samsung Galaxy Ring’s gesture feature lets you turn on an alarm or take a photo or video while the camera app is running by double-clicking your finger and thumb while wearing the ring.
How to activate gestures on Galaxy Ring :
To use the Galaxy Ring’s gesture controls, follow these steps:
- Open the Galaxy Wearable app on the smartphone connected to the Galaxy Ring.
- Navigate to the “Gestures” section within the Galaxy Ring’ Settings.
- Choose which functions you want to control with gestures. Options include dismissing an alarm or taking a photo or video.

After you have chosen your desired functions, you can start using them by performing a simple gesture. To dismiss an alarm or capture a photo or video, double-tap with your finger and thumb while wearing the Galaxy Ring. This gesture will start the selected function without needing to touch your phone.
If you have a Galaxy Z Fold 6 or Z Flip 6 model, you can start using these features. This feature will be extended to other Galaxy devices through future software updates.
Galaxy Ring
Samsung Galaxy Ring features a sleek design with dimensions of 7.0 mm x 2.6 mm, 24-hour-a-day health monitoring, long-lasting battery from 18mAh (Size 5) to 23.5mAh (Size 13), Galaxy AI features, and more.
Moreover, the Galaxy Ring provides comprehensive health insights and analysis via the Samsung Health app without any additional fees. It gives detailed metrics on sleep patterns, including movement, sleep latency, heart rate, and breathing rate during sleep. It also introduces Energy score and Wellness tips for daily health insights.
Samsung finally releases Galaxy Ring: Here’s all you need to know
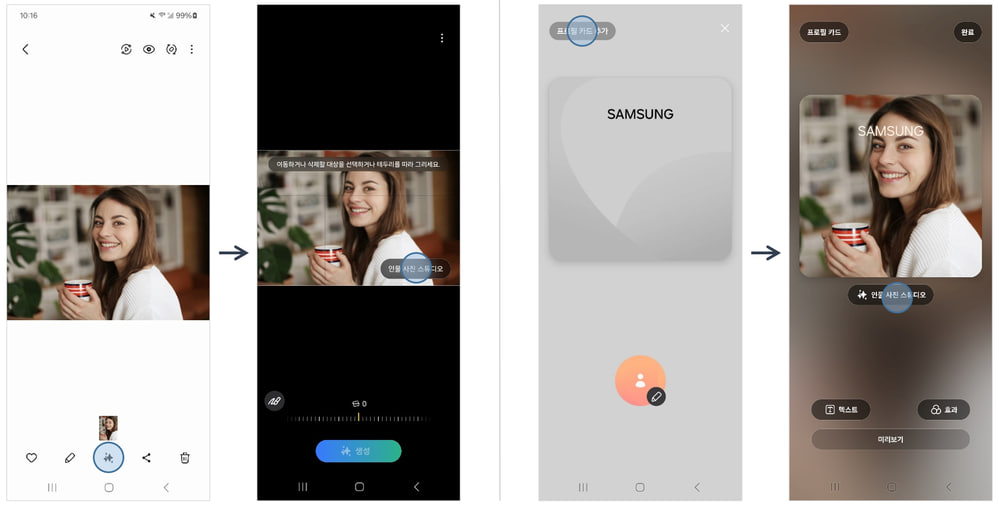
Samsung launched the Galaxy Z Flip 6 and Galaxy Z Fold 6 with One UI 6.1.1 software, introducing an impressive feature called Portrait Studio. This feature uses generative AI to transform normal photos into artistic portraits with just a few taps.
Portrait Studio of One UI 6.1.1 is accessible through Gallery and Contacts apps. It offers four different styles of portraits- Comic, 3D Character, Watercolor, and Sketch. Whether you prefer a comic-inspired look or a watercolor effect, there’s a style for every taste.
The process of using the Portrait Studio is very simple. First, select a portrait photo from your gallery, pick the desired style, and let the AI work its magic. Even if there are multiple people in the photo, you can select which individual you want the portrait created for.

The AI processing takes around 15 seconds to generate the portrait, and if you’re not completely satisfied with the result, you can easily create another version with the ‘Create Again’ button. Final Portraits can be saved through the photo editor or you can set directly it as a profile image for contacts.

The quality of the generated portrait improves with higher-resolution photos where the subject is visible and facing forward. Also, all portraits created using Portrait Studio contain a watermark in the bottom left corner to indicate their AI generation.
The good news is that Samsung plans to expand the availability of Portrait Studio beyond the Galaxy Z Flip 6 and Z Fold 6. Users of Galaxy Z Fold 5, Galaxy Z Flip 5, Galaxy Z Fold 4, Galaxy Z Flip 4, Galaxy S24, Galaxy S23 FE, Galaxy S23, Galaxy S22, Galaxy Tab S8, and Galaxy Tab S9 devices will soon also enjoy this amazing feature.
As the rollout progresses, more Samsung users can enjoy the amazing styles of AI-enhanced portraits on their smartphones. Stay tuned for more information.
One UI 6.1.1 update will bring Auto Zoom feature to Galaxy Z Flip 5