
Samsung Galaxy Note 20 Ultra: Ultimate Camera Tips and Tricks
Samsung Galaxy Note 20 Ultra is the latest flagship smartphone from Samsung. This premium device comes packed with powerful software capabilities and monstrous hardware performance.
One of the notes taking specialty of the Note 20 Ultra lies on its back. Yes, we’re talking about the camera setup, which rests inside a huge camera bump.
Including a 108MP Wide-angle F/1.8 aperture camera, a 12MP ultra wide-angle camera (f/2.2 aperture), a Space Zoom 5X optical zoom camera that can stretch up to 50X digital zoom alongside laser autofocus and LED flash. Aside from these, the phone also has a 10MP selfie camera with f/2.2 aperture and dual-pixel autofocus to provide you best selfies.
To get the most out of Samsung Galaxy Note 20 Ultra, we’ve created this camera guide with tips and tricks that’ll help to get you up and running as well as dominate your image capturing experience.
The guide below includes:
- Camera app interface
- Camera modes
- Key features
- Tips for “More” camera mode
Join us on Telegram
LET’S TALK ABOUT THE CAMERA FEATURES:
Camera Interface Tips:
- Tap on the screen where you want to focus.
- When you tap the screen, a brightness scale will appear on your screen. Drag the slider to adjust the brightness.
- Swipe the screen up or down to quickly switch between the front and rear cameras.
- Swipe the screen right or left to change the shooting mode.
- To change camera settings, tap Settings.
Camera button
- Tap and hold the camera button to record a video.
- To take burst shots, swipe the camera button to the edge of the screen and hold it.
- If you add another camera button, you can move it anywhere on the screen and take photos more conveniently. On the preview screen, tap > Shooting methods and tap the Floating Shutter button switch to activate it.

Configuration of shooting mode:
Allow the camera to determine the ideal mode for your pictures or choose from several shooting modes.
Tip: Swipe the screen right and left to change shooting modes.
- Single take: Capture multiple pictures and video clips from different angles.
- Photo: This option allows you to click pictures on the ideal settings.
- Video: Allow the camera to record videos on the ideal settings.
- More: Choose other available shooting modes. Tap Edit to drag modes into or out of the shooting modes tray at the bottom of the Camera screen.
- Pro: Pro mode allows you to manually adjust the ISO, exposure value, white balance, and color tone while taking pictures.
Top Tips:
1. Activate 108MP high-resolution:
The Galaxy Note 20 Ultra comes with a 108MP main wide-angle camera but you’ll have to activate it manually to use use it.
- Camera
- Aspect Ratio
- Select “3:4 108MP”

2. 8K and 4K 60FPS:
With Galaxy Note 20 Ultra, you can capture your world in 8K super high-resolution. Also, you can turn on 60 frames per second (fps) of 4K UHD for more detailed and crisp video recording.
To Change Video Resolution:
- Open Camera
- Settings
- Rear video Size
- Select aspect ratio

3. 4K Selfie:
Turn on 4K front camera video recording to get a high-resolution selfie video.

4. Wide-angle, Ultra Wide-angle, and 5X Zoom (50X Digital)
Use on-screen icons to adjust or drag it to the left or right to zoom in or out. Alternatively, spread two fingers apart on the screen to zoom in, and pinch to zoom out. If the zoom ratio exceeds a certain level, a zoom guide map will appear to indicate where you are zooming in on the image.
- The Ultra-wide camera lets you take wide-angle photos or record wide-angle videos of things like landscapes.
- The wide-angle camera lets you take basic photos or record normal videos.
- The telephoto camera lets you take photos or record videos by enlarging the subject.

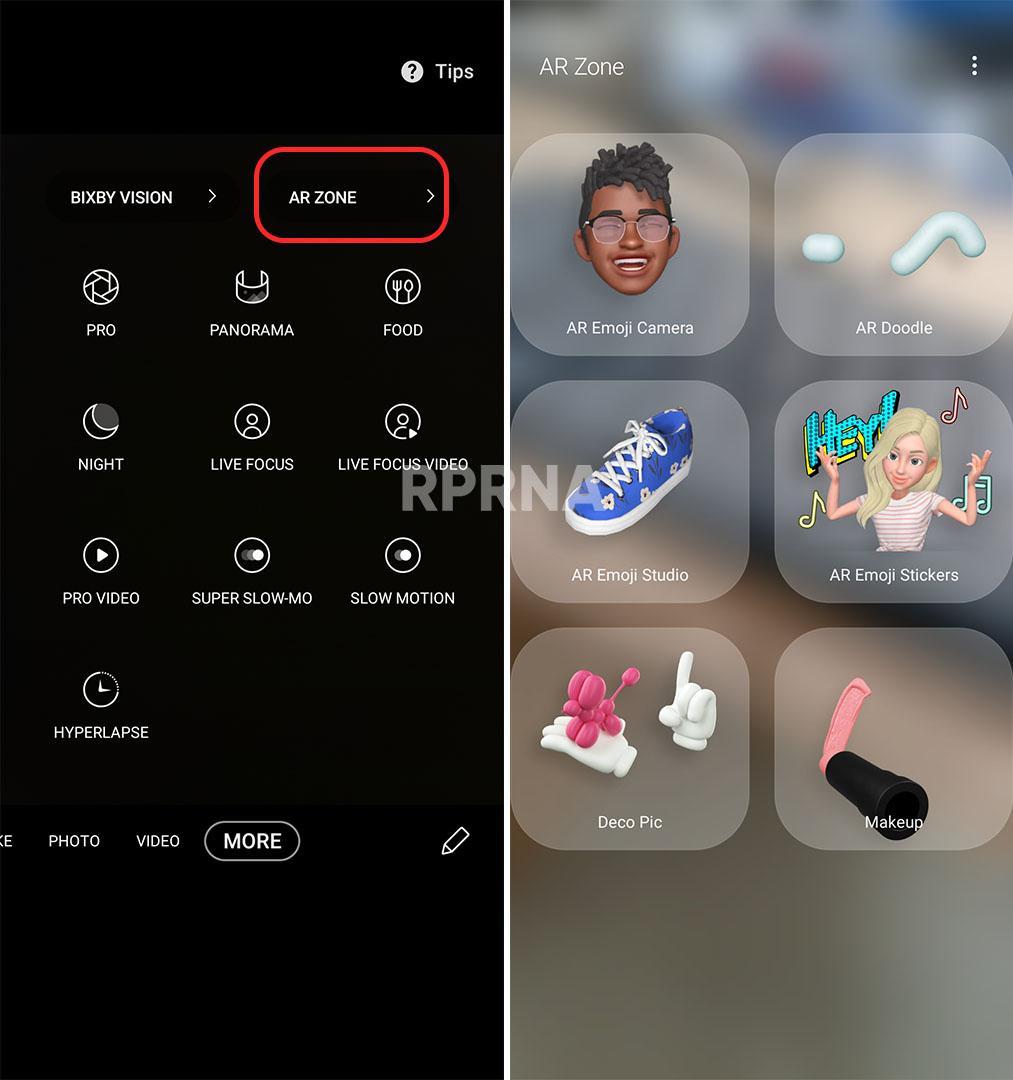
5. AR Zone:
If you want to have some fun with Augmented Reality, we will recommend you take a look at Samsung Galaxy Note 20 Ultra’s AR Zone.
This feature allows you to create AR Emojis, AR doodles, AR Emoji Studio, AR Makeup, and even feature your self in a Deco pic. Furthermore, you can download extra extensions such as Quick Measure and Home doctor AR modes.
“More” Modes in Details:
Panorama Mode: Panorama mode allows you to capture more of the scene by combining images to create a panoramic photo.
How to click Panorama Image:
- Open the Camera app
- Choose Panorama mode
- Press the capture button to start taking your photo (The screen will show an alignment box to help you keep the scene aligned)
- Slowly move the device in one direction
- When you touch the stop button or you reach the maximum range your device will make the necessary adjustments and stitch the images together to form one complete panoramic photo
- To view the captured Panorama, choose the preview thumbnail
Food: Food Mode will automatically adjust the colors of food in the frame, making them appear more vibrant and making your meal look even more delicious.
How to use Food Mode:
- Open the camera, then choose Food or Food Mode
- Drag the highlighted area until the food is within it
- You can adjust the size of the area by dragging it from one of the corners
- Tap the Capture button to take your picture
Night: Night mode gives you the power to take great photos in low light conditions, letting you get a clear shot even if it’s night or you’re in a dimly lit room. Night mode recognizes the light levels in a scene and automatically adjusts the exposure and white balance, letting you capture details you can’t see yourself.
Live focus: Live focus gives you direct control over the bokeh effect, allowing you to adjust the level of background blur in real-time. You can even adjust the blur after your photo has been taken, making sure that you always get the perfect shot.
How to use Live focus:
- Open your camera and choose Live Focus
- Tap an effect to select it
- Adjust the blur by dragging the slider to the left or right
- Tap the capture button to take the photo
Tip: If you are unhappy with the blur in the picture after it has been captured, you can adjust your Live focus pictures in the Gallery.
Scene optimizer: Scene optimizer is an intelligent photo assistant that automatically detects what is in the frame and adjusts your camera settings to help you capture the best shot available. Scene optimizer can adjust many settings while also selecting from around 30 modes to find the most suitable one for your image.
How to use Scene optimizer:
- Open your Camera, then tap the settings icon
- Tap Scene optimizer (if the Scene optimizer option is greyed out, try switching to the rear-facing camera)
- Tap the switch to turn Scene optimizer on
- Once the Scene optimizer has been enabled, you can activate the Document scan by tapping the switch. Document scan allows you to scan paper documents and save them as images without distortion
Tip: If Scene optimizer has been turned on in the settings, it can be quickly enabled and disabled by tapping the icon at the bottom right of the screen. A notification will appear when the feature is turned on and off.
Record videos: Record high-quality videos using your device.
How to Record videos:
- Open your Camera, then swipe right or left to change the shooting mode to Video.
- Tap Capture to begin recording a video
- To take a picture while recording, tap Capture.
- To temporarily stop recording, tap Pause. To continue recording, tap
Resume. - Tap Stop when you are finished recording.

Live focus video:
Create professional-looking films by applying background blurs and other special effects to your video.
This feature cannot be used with Zoom, Zoom-in mic, or Super steady.
How to Record Live focus videos:
- From Camera, swipe to More, then tap Live focus video.
- Tap Live focus effect, choose an effect, and drag the slider to fine-tune the effect.
- Tap Capture to begin recording.
Zoom-in mic:
Increase the volume of the sound being recorded and minimize background noise as you zoom in on an audio source. This feature cannot be used with Live focus video, Super steady, or with the front camera.
How to use Zoom-in mic:
- From Camera, tap Settings.
- Tap Advanced recording options > Zoom-in mic, and tap to enable.
- Tap Back to return to the main Camera screen.
- Swipe to change the shooting mode to Video.
- Tap Capture to begin recording.
- Bring your fingers together or apart on the screen to zoom in or out on the audio source. The microphone icon indicates the level of amplification is applied.
Slow Motion Video: Slow Motion allows you to record a video then play it back at up to eight times slower than normal, perfect for filming action shots and creating unique videos.
How to record Slow-motion video:
- Open your camera app, then choose Slow motion. The camera will automatically zoom in
- Tap the record icon
- Once you’ve finished shooting your video, tap the stop icon
- To edit your slow-motion video, tap the quick view box. You can also open your video from the Gallery app
- Tap Play slow-motion video
- Drag the markers to change which part of the video you would like to be in slow motion
- Drag the slideshow from either end to change the length of your video
- When you are happy with your video, tap Save
Super steady: Super steady applies advanced stabilization algorithms to your video for a smooth, professional appearance, even in heavy motion situations. This feature cannot be used with Zoom-in mic, Live focus video, Slow motion, or the front camera.
How to Record Live focus videos:
- From Camera, swipe to change the shooting mode to Video.
- Tap Super steady.
- Tap Capture to begin recording.
Wide-angle lens: Your device features a wide-angle lens. If the rear camera is close to the subject, it applies a blur effect to the background, so the subject stands out. When the camera is farther away from the subject, both the subject and background are clear. Minor distortion may appear in wide-angle photos or videos. To correct this distortion in photos you can turn on Ultrawide shape correction.
How to use a Wide-angle lens:
- From Camera, tap Settings.
- Tap Save options > Ultra wide shape correction.
Camera settings: Use the icons on the main camera screen and the settings menu to configure your camera’s settings.
From Camera, tap Settings for the following options:
Intelligent features:
- Scene optimizer: Automatically adjust the color settings of your pictures to match the subject matter.
- Shot suggestions: Get tips to help you choose the best shooting mode.
- Smart selfie angle: Automatically switch to a wide-angle selfie when there are more than two people in the frame.
- Scan QR codes: Automatically detect QR codes when using the camera.
Pictures: Swipe Shutter button to edge to: Choose to either take a burst shot or create a GIF when you swipe the shutter to the nearest edge.
Save options: Choose file formats and other saving options.
HEIF pictures (Photo): Save pictures as high-efficiency images to save space. Some sharing sites may not support this format.
Save RAW copies: Save JPEG and RAW copies of pictures taken in Pro mode.
Ultra-wide shape correction: Automatically correct distortion in pictures taken with the ultra-wide lens.
Videos:
Rear video size: Choose an aspect ratio and resolution for videos captured with the rear cameras. You can also see the 8k recording option here.
Front video size: Choose an aspect ratio and resolution for videos captured with the front camera.
Pro video size: Choose an aspect ratio, resolution, and frame rate for cinematic-quality video.
Advanced recording options: Enhance your videos with advanced recording formats.
- High-efficiency video: Record videos in HEVC format to save space. Other
devices or sharing sites may not support playback of this format. - HDR10+ video: Optimize videos by recording in HDR10+. Playback devices
must support HDR10+ video. - Zoom-in mic: Match the mic zoom to the camera zoom while recording videos. See Zoom-in mic.
Video stabilization: Activate anti-shake to keep the focus steady when the camera is moving.
Useful features:
Auto HDR: Capture more detail in the bright and dark areas of your shots
Selfie tone: Add a warm or cool tint to your selfies.
Tracking auto-focus: Keep a moving subject in focus.
Pictures as previewed: Save selfies as they appear in the preview without flipping them.
Gridlines: Display viewfinder grid lines to help compose a picture or video.
Location tags: Attach a GPS location tag to the picture.
Shooting methods:
- Press the Volume key to: Use the Volume key to take pictures, record video, zoom, or control system volume.
- Voice control: Take pictures speaking key words.
- Floating shutter button: Add an extra shutter button that you can move anywhere on the screen.
- Show palm: Hold your hand out with your palm facing the camera to have your picture taken in a few seconds.
Settings to keep: Choose whether to launch Camera with the same shooting mode, selfie angle, and filters as the last time.
Storage location: Select a memory location (Galaxy Note20 Ultra 5G only).
- A memory card (not included) must be installed to view the Storage location.
Shutter sound: Play a tone when taking a picture.
Touch vibrations: Enable vibrations when tapping the screen in the Camera app.
Reset settings: Reset the camera settings.


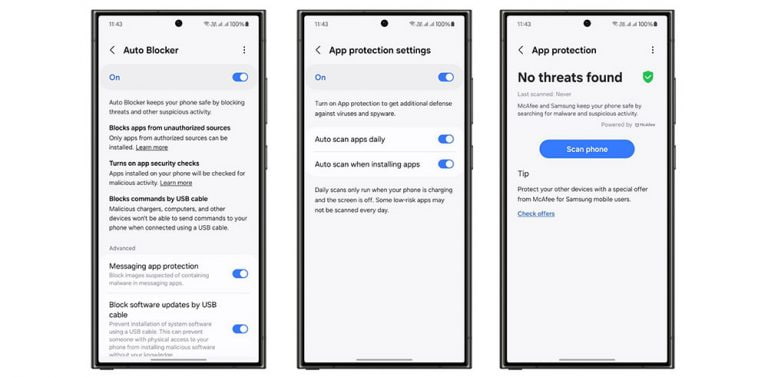
In today’s era, ensuring our online activities remain secure is very important. For that, Samsung has a powerful feature called Auto Blocker, which enhances user privacy and protects devices from cyber threats effectively. You can easily activate the Auto Blocker feature on your Samsung One UI 6.1 devices.
Auto Blocker feature is mainly valuable for safeguarding against malware and viruses that often infiltrate your device via applications outside the official platform such as the Google Play Store and Samsung Galaxy Store.
It prevents devices from downloading applications without user confirmation from suspicious sources. Users can enjoy a safer browsing experience with minimized exposure to potential threats.
Moreover, the feature also blocks unauthorized commands attempting to access the device through the USB port. This feature is especially useful when connecting devices to transfer files.
You can easily activate Auto Blocker on your One UI 6.1 Samsung device, just need to follow a few steps:
- Navigate to the Settings app on your smartphone.
- Scroll down and select Security and Privacy from the list of options
- Find the Auto Blocker menu. From there, toggle the feature on to enable its protective functionalities.

Users can also customize settings further, such as activating the Messaging app protection option or blocking software updates via USB, depending on their security preferences.
By enabling Auto Blocker, users significantly reduce the risk of malware and viruses infiltrating their devices through untrusted sources. This feature not only safeguards your personal data but also enhances the overall security of your Samsung device.

Samsung has updated several Galaxy devices to One UI 6.1, with plans to extend this update to all eligible devices soon. This latest update not only enhances the overall performance but significantly boosts the device’s security. If you want your Samsung One UI 6.1 device to remain safe even during servicing, you can use the Maintenance Mode.
Maintenance Mode is an innovative feature that safeguards users’ personal data during device repair. As smartphones store increasingly sensitive information, it is important to protect this data when giving the device for repairs.
This mode allows service technicians to access the necessary functions of the phone without exposing any personal information. It enhances the privacy and security of Galaxy devices.
The feature also ensures that applications installed by the user are not removed. Any data or accounts created while in Maintenance Mode will be automatically deleted once the mode is turned off.
To activate Maintenance Mode on your Samsung One UI 6.1 devices, follow these steps:
- Go to Settings on your device.
- Select Device Care.
- Choose Maintenance Mode.
- In the menu, select the Secure Wi-Fi option.
- Click on Turn On to enable the feature.
- Restart the device as instructed to secure your personal data.

You’ll need to unlock your phone to turn off Maintenance mode. When you do, everything will go back to the way it was when Maintenance mode was first turned on.
In an age where digital security is more important than ever, Samsung keeps Galaxy devices secure with its App Protection feature. Let’s see how you can enable the App Protection feature on your One UI 6.1 device and keep your Samsung smartphone more secure.
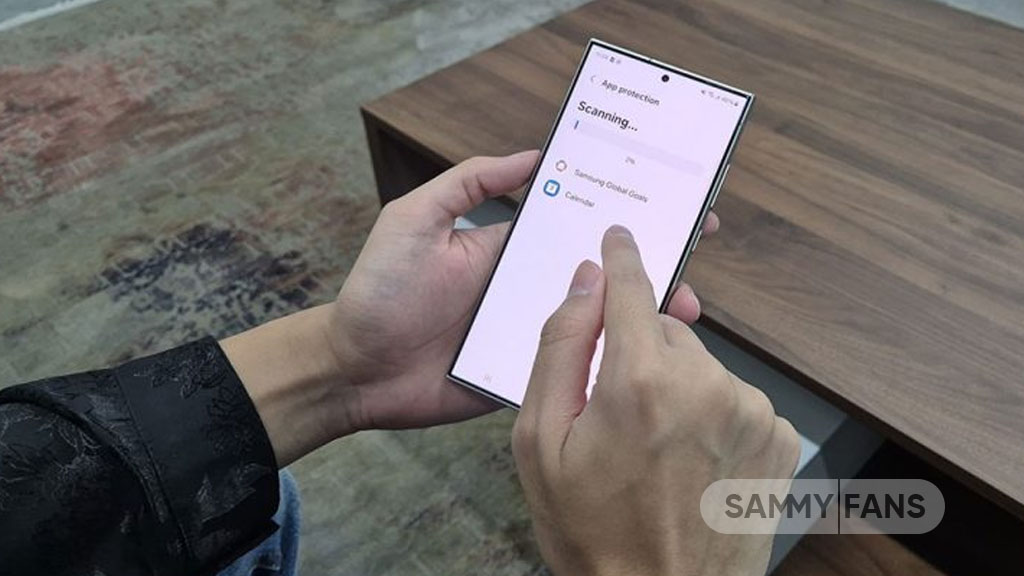
Samsung’s App Protection Feature scans your device to save it from the unseen dangers of malware and viruses. It works seamlessly in the background, automatically scanning all applications and files on your device.
If a security issue is noticed, you can uninstall or stop the download process of the related application to avoid data theft.
Here’s how to activate the App Protection feature
You can activate the App Protection feature on your One UI 6.1 device with just a few taps.
- Open Settings and select Device Care.
- Turn on App Protection within the Device Care menu.
- After enabling, the device will start scanning.
- For additional settings, tap the More icon and go to Settings.
- Enable options such as Auto-scan apps daily and Auto-scan when installing apps.
- By enabling Auto Blocker, App Protection will also be activated.
By following these steps, you can set up your Galaxy smartphone to automatically monitor and protect your device. This feature simplifies the process of maintaining your digital safety, allowing you to focus on your day-to-day activities without worry.
Stay up-to-date on Samsung Galaxy, One UI & Tech Stuffs by following Sammy Fans on X/Twitter. You can also discover the latest news, polls, reviews, and new features for Samsung & Google Apps, Galaxy Phones, and the One UI/Android operating system.
Do you like this post? Kindly, let us know on X/Twitter: we love hearing your feedback! If you prefer using other social platforms besides X, follow/join us on Google News, Facebook, and Telegram.