Tips and Tricks
How to change screenshots folder in Samsung Galaxy: One UI 5.1 Tips and Tricks
Until the One UI 5.0, there’s no way to customize the folder of saved screenshots. Though, a bit late, Samsung officially brought the ability to change the folder where screenshots and screen recordings are saved, thanks to the new One UI 5.1 update.
Samsung’s One UI saves screenshots and screen recordings in the DCIM folder by default. Most users wanted the ability to customize the screenshots storage folder, and the new One UI 5.1 update makes it possible on Galaxy devices. If you want to know how to change location, follow the steps given below:
Follow our socials → Google News, Telegram, Twitter, Facebook
- Open the Apps Screen, visit System Settings, followed by Advanced features
- Beside the Smart suggestions, you should see the Screenshots and screen recorder tab, tap on it
- For Screenshots,
- Tap the “Save screenshots in” option
- For the Screen recorder,
- Tap the “Screen recordings in” option


By changing the location, you can prevent the Google Photos app from backing up screenshots and screen recordings. This is quite useful as screenshots will no longer occupy the storage of Google Photos cloud storage. However, separating them also enhances access to the DCIM folder for important images.
One UI 5.1 is official
On Feb 15, Samsung officially introduced the One UI 5.1 software for older Galaxy devices. Apart from this, the company confirmed that the new software update is coming to several Galaxy devices in the coming weeks. You can check the roadmap here.
One UI 5.1 Features
- New dynamic weather widget
- Battery Status Widget
- Integrated Expert RAW
- Powerful Photo Remaster
- Tap face to search person in Gallery
- Shared family albums in Gallery
- Spotify recommendation in Smart Suggestions widget
- Modes and Routines: Custom wallpapers, ringtones, touch sensitivity and fonts
- Integrated Samsung Notes with Google Meet
- Multi control between Galaxy Book and smartphones
- Continue browsing the same pages on their PC


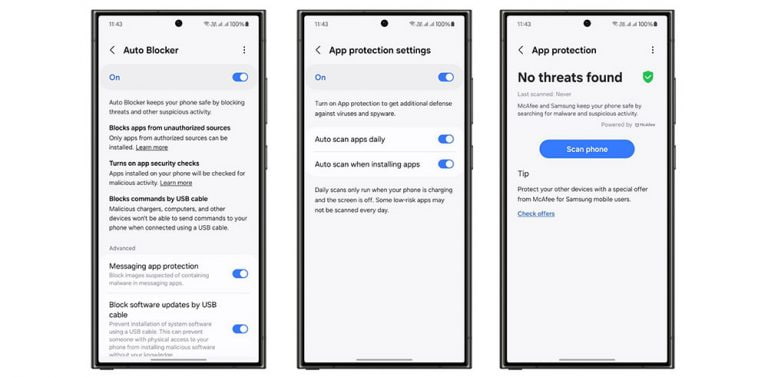
In today’s era, ensuring our online activities remain secure is very important. For that, Samsung has a powerful feature called Auto Blocker, which enhances user privacy and protects devices from cyber threats effectively. You can easily activate the Auto Blocker feature on your Samsung One UI 6.1 devices.
Auto Blocker feature is mainly valuable for safeguarding against malware and viruses that often infiltrate your device via applications outside the official platform such as the Google Play Store and Samsung Galaxy Store.
It prevents devices from downloading applications without user confirmation from suspicious sources. Users can enjoy a safer browsing experience with minimized exposure to potential threats.
Moreover, the feature also blocks unauthorized commands attempting to access the device through the USB port. This feature is especially useful when connecting devices to transfer files.
You can easily activate Auto Blocker on your One UI 6.1 Samsung device, just need to follow a few steps:
- Navigate to the Settings app on your smartphone.
- Scroll down and select Security and Privacy from the list of options
- Find the Auto Blocker menu. From there, toggle the feature on to enable its protective functionalities.

Users can also customize settings further, such as activating the Messaging app protection option or blocking software updates via USB, depending on their security preferences.
By enabling Auto Blocker, users significantly reduce the risk of malware and viruses infiltrating their devices through untrusted sources. This feature not only safeguards your personal data but also enhances the overall security of your Samsung device.

Samsung has updated several Galaxy devices to One UI 6.1, with plans to extend this update to all eligible devices soon. This latest update not only enhances the overall performance but significantly boosts the device’s security. If you want your Samsung One UI 6.1 device to remain safe even during servicing, you can use the Maintenance Mode.
Maintenance Mode is an innovative feature that safeguards users’ personal data during device repair. As smartphones store increasingly sensitive information, it is important to protect this data when giving the device for repairs.
This mode allows service technicians to access the necessary functions of the phone without exposing any personal information. It enhances the privacy and security of Galaxy devices.
The feature also ensures that applications installed by the user are not removed. Any data or accounts created while in Maintenance Mode will be automatically deleted once the mode is turned off.
To activate Maintenance Mode on your Samsung One UI 6.1 devices, follow these steps:
- Go to Settings on your device.
- Select Device Care.
- Choose Maintenance Mode.
- In the menu, select the Secure Wi-Fi option.
- Click on Turn On to enable the feature.
- Restart the device as instructed to secure your personal data.

You’ll need to unlock your phone to turn off Maintenance mode. When you do, everything will go back to the way it was when Maintenance mode was first turned on.
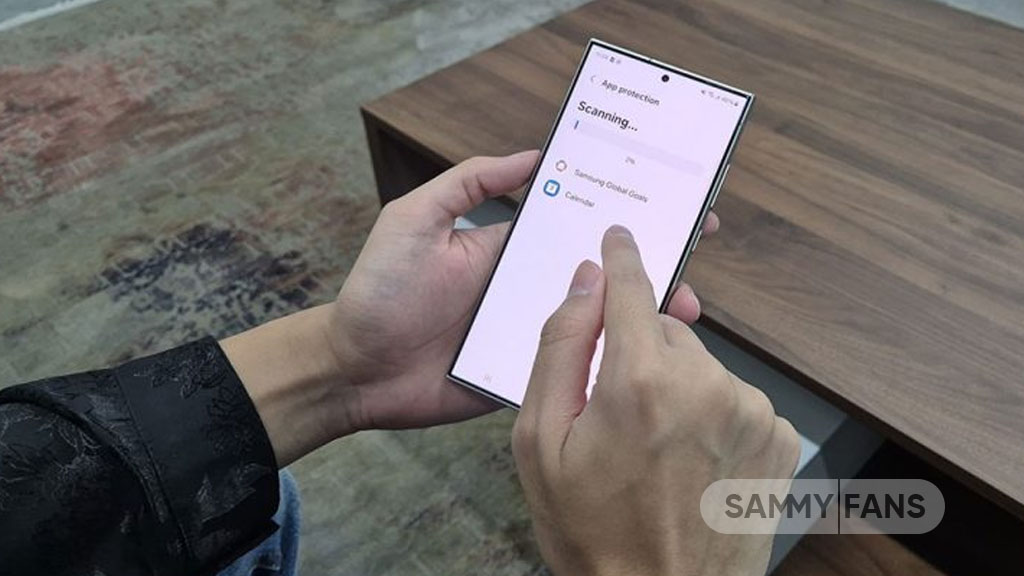
In an age where digital security is more important than ever, Samsung keeps Galaxy devices secure with its App Protection feature. Let’s see how you can enable the App Protection feature on your One UI 6.1 device and keep your Samsung smartphone more secure.
Samsung’s App Protection Feature scans your device to save it from the unseen dangers of malware and viruses. It works seamlessly in the background, automatically scanning all applications and files on your device.
If a security issue is noticed, you can uninstall or stop the download process of the related application to avoid data theft.
Here’s how to activate the App Protection feature
You can activate the App Protection feature on your One UI 6.1 device with just a few taps.
- Open Settings and select Device Care.
- Turn on App Protection within the Device Care menu.
- After enabling, the device will start scanning.
- For additional settings, tap the More icon and go to Settings.
- Enable options such as Auto-scan apps daily and Auto-scan when installing apps.
- By enabling Auto Blocker, App Protection will also be activated.
By following these steps, you can set up your Galaxy smartphone to automatically monitor and protect your device. This feature simplifies the process of maintaining your digital safety, allowing you to focus on your day-to-day activities without worry.
Stay up-to-date on Samsung Galaxy, One UI & Tech Stuffs by following Sammy Fans on X/Twitter. You can also discover the latest news, polls, reviews, and new features for Samsung & Google Apps, Galaxy Phones, and the One UI/Android operating system.
Do you like this post? Kindly, let us know on X/Twitter: we love hearing your feedback! If you prefer using other social platforms besides X, follow/join us on Google News, Facebook, and Telegram.